
Most beginners assume they need an expensive laboratory power supply to get started. In reality, a versatile Automatic Buck-Boost Converter Module is often the better choice. It is not just a regulator; it is a portable, adjustable charger and safe tester that can handle input from batteries, solar panels, or old laptop bricks (5.5V–30V) and output a precise 0.5V to 30V at up to 4A (35W).
Disclaimer: This information is provided in good faith for educational purposes. While we strive for accuracy, this material is provided “as-is.” By using this guide, you acknowledge that you do so at your own risk. LogicHobbyist.com is not responsible for any damage to hardware or software resulting from the use of this free material.
🛠️ The Module Interface
Understanding the physical controls is vital for safe operation. Refer to the image below for the specific locations of the calibration points and buttons.
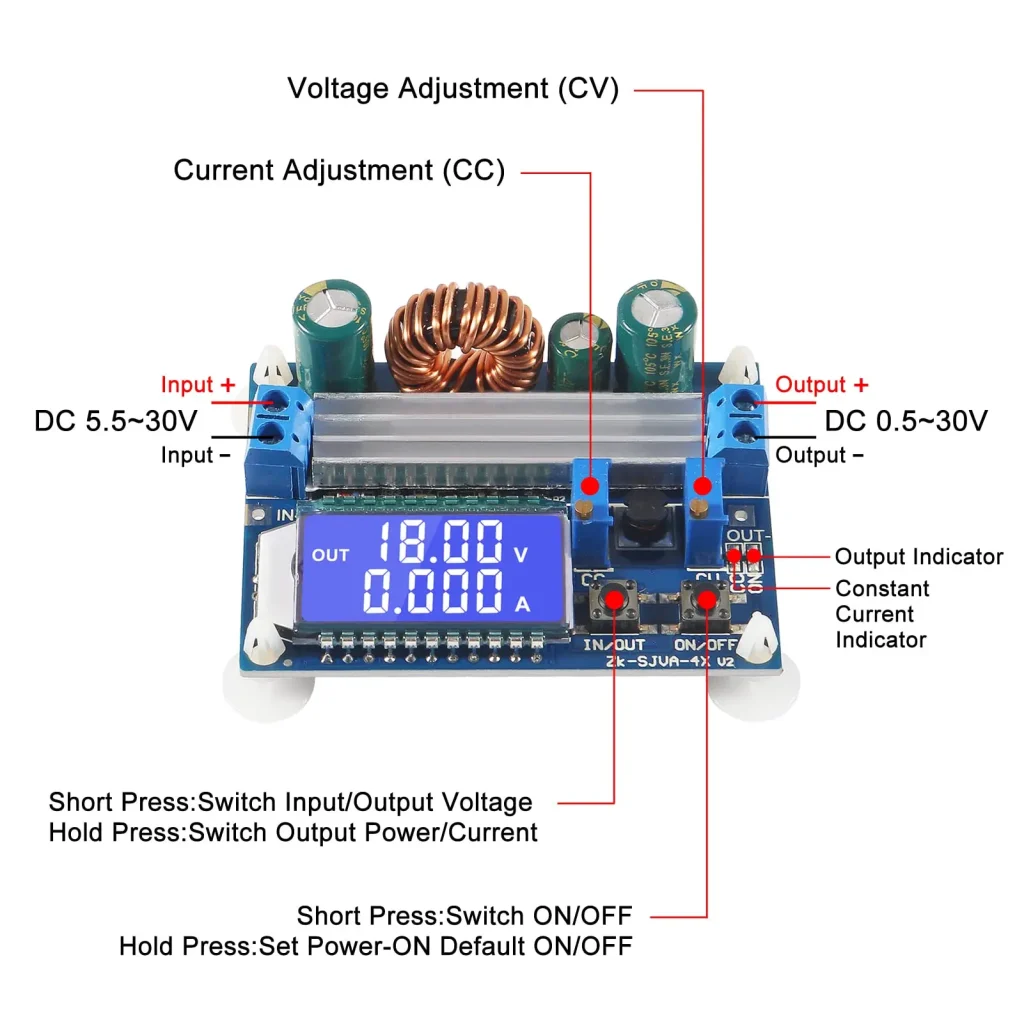
Figure 1: The Buck-Boost Control Interface & Button Logic
- CC (Left Potentiometer): Adjusts the Constant Current limit (Your Safety Guard).
- CV (Right Potentiometer): Adjusts the Constant Voltage (Your Target Power).
- IN/OUT Button:
- Short Press: Switch between Input and Output display.
- Long Press: Switch display between Current (A) and Power (W).
- ON/OFF Button:
- Short Press: Turn the output ON or OFF.
- Long Press: Set the Default State (Should the output be ON or OFF immediately when the module is powered?)
⚠️ CRITICAL SAFETY: Disconnect all devices from the output before adjusting. Even if the display shows 0V while “OFF,” you must physically disconnect your project to prevent accidental damage during the adjustment phase.
⚙️ Step-by-Step: Setting Your “Safety Ceiling”
Step 1: Adjusting the Voltage (CV)
- Plug in your input power source.
- Press ON/OFF to switch the output to ON.
- Short-press IN/OUT until the display shows OUT.
- Using a flat screwdriver, turn the CV Potentiometer until you reach your desired voltage (e.g., 24.0V).
Step 2: Locking the Current Limit (CC)
- Turn the CC Potentiometer anti-clockwise until you hear a faint “click.” Stop immediately; you are at the minimum.
- Short the output terminals (OUT+ to OUT-) with a wire.
- Turn the output ON.
- Turn CC clockwise until the display reads your safety limit (e.g., 0.20A).
- Turn output OFF and remove the shorting wire.
Pro Note: The CC setting protects you from wiring shorts. If your device needs more current than the limit, it won’t turn on—but if a short occurs, the limit prevents your power supply from melting your hardware.